
The Google Antigravity SDK (google-antigravity) is the official Antigravity Python package for running autonomous agents on the Antigravity runtime harness. It needs Python 3.10 or later. You authenticate with a Gemini API key or Google Cloud credentials, then run async agent sessions with Agent and LocalAgentConfig. Orbtile shows local Antigravity App conversations and your own Python adapter scripts on a Logitech MX Creative Keypad or phone.
What is the Google Antigravity SDK?
Google's Get started page lets you choose between four Antigravity surfaces. The SDK is the programmatic runtime:
| Surface | Runtime or version | How you start it | Core capabilities |
|---|---|---|---|
Antigravity SDK | Python 3.10+ (google-antigravity) | python hello_agent.py with Agent and LocalAgentConfig | Local runtime harness, await agent.chat(prompt), system_instructions, and allow, deny, ask_user tool policies |
Antigravity App | v2.5+ desktop app | Download from antigravity.google/download | Workspace Projects, Local mode, New worktree mode, role layouts and slash commands |
Antigravity CLI | agy v1.2+ terminal client | agy, agy -i "prompt" or agy -p "prompt" | Interactive TUI and single prompts, /diff viewer, Ctrl + R artifact review and Shift + Tab modes |
For IDEs and Antigravity IDE | Extensions for 7 IDEs and the standalone Antigravity IDE | Agent panel or Cmd + L (Ctrl + L) | Sessions that share context and customisations, interactive implementation plans and inline diffs |
Google's Get started page links four SDK resources:
- Architecture (SDK overview): the Python runtime harness and async session manager.
- Agent API (Personas and directives): system prompt configuration and specialised agent personas.
- Extensibility (Tools and skills API): registering custom Python tools, shell executors and skills.
- MCP (Model Context Protocol): integrating external MCP servers and resources into SDK pipelines.
See Google Antigravity: App, IDE, CLI, setup and agent workflows.
Install the Google Antigravity SDK in Python 3.10+
Install the official google-antigravity package inside a Python 3.10+ virtual environment. You can use pip, Poetry or uv:
pip install google-antigravity
# Poetry
poetry add google-antigravity
# uv
uv add google-antigravity
Then set your API or Google Cloud credentials before you initialise the agent harness.
Authenticate with a Gemini API key or Vertex AI
For direct Gemini API access, export GEMINI_API_KEY:
export GEMINI_API_KEY="your_api_key_here"For Gemini Enterprise or Vertex AI, set the Vertex AI flag, project ID and location. Then sign in with Application Default Credentials (ADC):
export GOOGLE_GENAI_USE_VERTEXAI=True
export GOOGLE_CLOUD_PROJECT="your-gcp-project"
export GOOGLE_CLOUD_LOCATION="us-central1"
gcloud auth application-default login
Google's reference lists four auth.type values across account tiers:
Auth type (auth.type) | Account tier | Description |
|---|---|---|
"oauth-personal" | Individual Google Accounts | Authenticates personal Google Account plans |
"oauth-business" | Gemini Enterprise (Preview) | Authenticates corporate identity with gcp.project and gcp.location |
"gemini-api-key" | Gemini API | Authenticates using a Gemini API key |
"agent-platform" | Agent Platform (Preview) | Authenticates with Gemini Enterprise Agent Platform via API key or ADC |
See Google Antigravity pricing: plans, quotas, models and credits.
Start an autonomous agent session with Agent and LocalAgentConfig
Create a file named hello_agent.py. Import Agent and LocalAgentConfig from google.antigravity, then run the session inside an asyncio event loop:
import asyncio
from google.antigravity import Agent, LocalAgentConfig

async def main():
    config = LocalAgentConfig()
    async with Agent(config) as agent:
        response = await agent.chat("What files are in the current directory and what is their purpose?")
        print(await response.text())

if __name__ == "__main__":
    asyncio.run(main())
Run python hello_agent.py in your terminal. The await response.text() call returns the text of the reply.
| Method or command | What it does |
|---|---|
await agent.chat(prompt) | Sends a user prompt to the agent and returns the turn response |
LocalAgentConfig(policies=...) | Configures declarative tool execution policies (allow, deny, ask_user) |
LocalAgentConfig(system_instructions=...) | Customises the agent persona and system instructions |
export GEMINI_API_KEY="..." | Sets Gemini API credentials in the environment |
Configure declarative tool execution policies
To limit which tools a local agent can call, pass rules from google.antigravity.hooks.policy to LocalAgentConfig(policies=...):
from google.antigravity import LocalAgentConfig
from google.antigravity.hooks.policy import allow, deny

config = LocalAgentConfig(
    policies=[
        deny("*"),
        allow("view_file"),
    ]
)denyblocks matching tools, anddeny("*")blocks every tool by default.allowpermits a specific tool, such asallow("view_file").ask_useris the third policy type listed forLocalAgentConfig(policies=...).
See Google Antigravity MCP servers: set up and manage tools and Antigravity CLI (agy): settings and allow all permissions.
How the Antigravity SDK fits with the App, CLI and IDEs
The SDK runs agents from your own Python code. The other three surfaces are for working with agents interactively.
Antigravity App projects, worktrees and role layouts
The Antigravity App (v2.5+) is available at antigravity.google/download. It runs on macOS 13 (Ventura) or later with Apple Silicon or 64-bit Intel, and on Windows 10 (64-bit) or Windows 11. On Linux it needs glibc >= 2.28 and glibcxx >= 3.4.25, such as Ubuntu 20+, Debian 10+, Fedora 36+ or RHEL 8+. It comes pre-installed on Googlebooks, with updates through Google Play.
From v2.30.0, personal Google Account sign-in asks for your role. You can switch layouts later in Settings > General > Interface Layout. Skip starts you with the Software Engineering setup.
Software EngineeringorData & Analyticssets theSoftware Engineeringlayout.- The
Software Engineeringrole offersBring over my setup from other Agentic Developer Tools. - That option imports MCP servers, skills, rules and instructions from Claude Code, Codex, Cursor and Gemini CLI.
Knowledge Work,Science,DesignorOthersets theKnowledge Worklayout.- After you confirm the Terms & Data Use notice, up to three dismissible starter prompts appear above the
Homemessage box. - Clicking a starter prompt installs its Marketplace plugin if needed and fills in
@<Plugin>without sending. - Gemini Enterprise and Google Cloud users choose
Use Business Account, then select an assigned licence and project, or pay as they go.
Projects set repository boundaries, file scopes and security permissions. Create one with New Project, then Add Folder, then Create. Software Engineering offers Local mode, which works in your active folders, and New worktree mode, which uses an isolated Git worktree. Knowledge Work runs in project folders without a worktree prompt, or straight from Home.
| Shortcut or command | macOS | Windows / Linux | Description |
|---|---|---|---|
| Conversation picker | Cmd + K | Ctrl + K | Search past conversations and switch to one |
| File search | Cmd + P | Ctrl + P | Find a file in the current project by name |
| Commands | Cmd + Shift + P | Ctrl + Shift + P | Search and run app commands |
| Find | Cmd + F | Ctrl + F | Find text in the conversation or open file |
| Focus input | Cmd + L | Ctrl + L | Move focus to the message box |
| New conversation | Cmd + N | Ctrl + N | Start a new agent session |
| Previous or next conversation | Option + ↑ / ↓ | Alt + ↑ / ↓ | Move between conversations |
/goal | Slash command | Slash command | Run the task autonomously to completion without pausing |
/grill-me | Slash command | Slash command | Interview you on requirements before coding |
/schedule | Slash command | Slash command | Run an instruction after a delay or on a cron schedule |
/browser | Slash command | Slash command | Hand UI testing, screenshots and web inspection to the browser subagent |
/plugin | Slash command | Slash command | Manage Marketplace plugins or build custom plugin bundles |
Antigravity CLI (agy) install, modes and commands
The Antigravity CLI (agy, v1.2+) installs to ~/.local/bin/agy on macOS, Linux and Googlebook:
curl -fsSL https://antigravity.google/cli/install.sh | bashOn Windows it installs to C:\Users\<username>\AppData\Local\agy\bin:
# Windows PowerShell
irm https://antigravity.google/cli/install.ps1 | iex:: Windows CMD
curl -fsSL https://antigravity.google/cli/install.cmd -o install.cmd && install.cmd && del install.cmdCheck the install with agy --version. On first launch you pick a colour scheme: Dark, Solarized Dark, Solarized Light or terminal default. You also pick Alt-Screen mode or Inline mode rendering, and confirm workspace trust before file indexing starts.
| CLI command or shortcut | Action |
|---|---|
agy or agy -i "prompt" | Launch the interactive TUI, with an optional first prompt |
agy -p "prompt" | Run a single prompt non-interactively |
Shift + Tab | Cycle auto, plan, default and accept-edits modes |
/diff | Open the interactive diff viewer |
Ctrl + R | Open the Artifact Review screen |
Tab | Inspect file diffs and tool details |
Ctrl + O | Expand or collapse the active tool pill |
Ctrl + C | Interrupt generation |
Esc | Exit the diff inspector or close an overlay |
/agents | Switch between background subagents |
/statusline | Turn on or configure the status line |
/usage | Show model credit consumption and quota limits |
Ctrl + D or /exit | Close the TUI and return to your shell |
Press Y when prompted to approve file creation or a command. In auto mode, the agent runs commands inside the terminal sandbox automatically. See Google Antigravity on Windows: install, CLI and setup.
Editor extensions for 7 IDEs and the standalone Antigravity IDE
Install the extension in one of seven editors, or download the standalone IDE from antigravity.google/download:
| Editor or IDE | Requirements | How to install, open or manage |
|---|---|---|
| VS Code | 1.90+ (macOS, Linux, Windows) | Extensions (Cmd + Shift + X or Ctrl + Shift + X) > install Google Antigravity > Activity Bar icon |
| JetBrains IDEs | IntelliJ-based IDEs 2026.2.1+ | JetBrains AI > Settings > Agents > Antigravity > Install |
| Android Studio | A release with Bring Your Own Agent (ACP) support | Agent tool window picker > Google Antigravity, or Settings > Tools > AI > Agents |
| Visual Studio | Visual Studio 2026 (17.8+) on Windows 10/11 | Extensions > Manage Extensions > Google Antigravity, restart, then open the Antigravity tool window |
| Zed | 0.140.0+ (macOS, Linux) | Command Palette (Cmd + Shift + P or Ctrl + Shift + P) > agent: open settings > External Agents > Add > Install from Registry |
| Xcode | 27 beta 6+ (macOS) | Xcode > Settings (Cmd + ,) > Intelligence > Get next to Antigravity |
| Eclipse | 2026-06+ (macOS, Linux, Windows, Public Preview) | Help > Eclipse Marketplace… > Google Antigravity, restart, then Antigravity > Toggle Chat |
| Standalone Antigravity IDE | macOS 12+, Windows 10 (64-bit)+, Linux or Googlebook (glibc >= 2.28, glibcxx >= 3.4.25) | Cmd + L (Ctrl + L) focuses the Agent panel, Cmd + Shift + L (Ctrl + Shift + L) starts a new conversation, and Toggle Agent shows or hides it |
Gemini Enterprise is GA in VS Code, Visual Studio, JetBrains, Zed and Xcode, and in Preview for Android Studio and Eclipse. See Antigravity App vs Antigravity IDE: what's the difference and Google Antigravity IDE: editor, agents and permissions.
Mapping Antigravity shortcuts to a Logitech MX Keypad in Logi Options+
The Logitech MX Keypad has customisable LCD keys and swaps tools automatically when you change apps. You can build custom tools with the Logi Actions SDK, by hand or with AI. It needs Logi Options+ 2.07 or later, on Windows 10 or later or macOS 13 or later. Windows systems with ARM64 processors are not supported, and the Keypad cannot be used without Logi Options+.
To map an app that has no Marketplace plugin:
- Click
+in the profile bar and chooseAPPLICATION PROFILE. - Select your app, or click
ADD APPLICATIONto point to its executable. - Click
START WITH A BLANK TEMPLATE, name the profile and clickCONFIRM. - Open
ALL ACTIONS, selectSYSTEM, then dragKEYBOARD SHORTCUTfromKEYBOARDonto a key. - Click the
KEYfield, press your shortcut and clickSave.
See Antigravity keypad: MX Keypad shortcuts and Orbtile status pad.
Watch Antigravity App conversations and SDK scripts with Orbtile
Orbtile runs on macOS 14.0 or later on Apple silicon (M1 or later), or on a Windows 11 PC (x64). It drives the nine LCD keys and two page buttons of the Logitech MX Creative Keypad over USB, without Logi Options+. It can also show tiles on an iPhone (iOS 17+) or an Android phone (Android 8.0+) with Orbtile Mobile.
Local Antigravity desktop app conversations
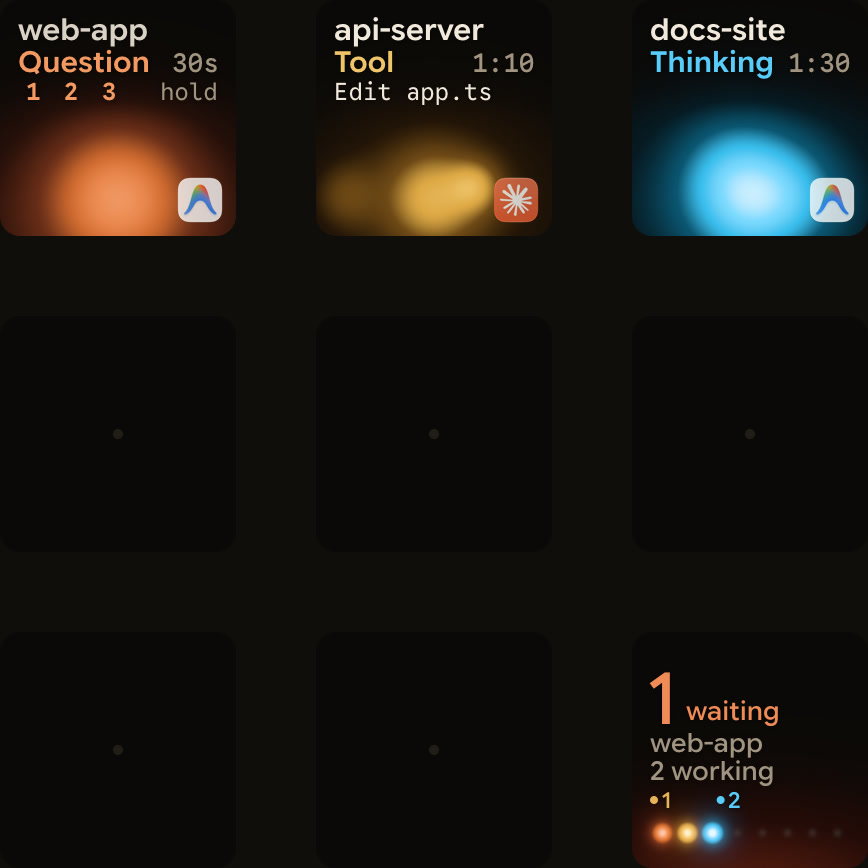
- Orbtile shows each conversation in the Antigravity desktop app as its own key, with its title and state.
- Working conversations use an azure blue palette.
- From Orbtile 0.3.4, waiting states use the shared terracotta alarm colour.
- From Orbtile 0.2.10, replies also appear as live typewriter text.
- A conversation that's waiting on a question moves to the front.
- Tap key 9 to focus the first waiting session, including sessions on other pages.
- From Orbtile 0.2.6, the keys can answer up to four questions with two to four choices each.
- Hold the waiting key to open the question, then pick an option on keys 1, 2, 3 or 7.
- On the last question, hold
Sendon key 9 for 0.6 seconds. - Permission requests and written answers stay on your computer.
Custom Python scripts built with the Antigravity SDK
Orbtile follows the Antigravity desktop app only, so Antigravity IDE and CLI sessions don't appear on their own. A Python script you build with the SDK can report its own status through Orbtile's local Adapter API, which is at protocol v1.2 in Orbtile 0.3.4. Install the Python package with python3 -m pip install orbtile-adapter. In Orbtile, open Settings > Agents, choose Build your own, turn on Let your own tools show sessions, then allow your adapter:
from orbtile_adapter import Client

registration = {"name": "Tiny agent", "palette": {"baseHue": 150}}
with Client("dev.example.agent", registration) as client:
    client.upsert_session("run", title="Hello", activity="thinking")
Adapter events stay on your computer and are never sent to Orbtile's servers. The same keypad or phone also shows Claude Code, Codex, ZCode and Kimi Code sessions. See Show any script or agent on a keypad with the Orbtile Adapter API and Antigravity notifications: CLI alerts and waiting agents.
FAQ
How do I install the Google Antigravity SDK in Python?
Create and activate a Python 3.10 or newer virtual environment, then run pip install google-antigravity. If your project uses Poetry or uv, run poetry add google-antigravity or uv add google-antigravity instead.
How do I authenticate the Google Antigravity SDK with Gemini API or Vertex AI?
Set your credentials in the environment before you initialise the agent harness. For the Gemini API, export the GEMINI_API_KEY environment variable. For Gemini Enterprise or Vertex AI, set GOOGLE_GENAI_USE_VERTEXAI to True along with GOOGLE_CLOUD_PROJECT and GOOGLE_CLOUD_LOCATION, then run gcloud auth application-default login.
How do I restrict which tools an Antigravity SDK agent can run?
Import LocalAgentConfig from google.antigravity, and import allow and deny from google.antigravity.hooks.policy. Pass a policies list to LocalAgentConfig, for example denying all tools with a wildcard and allowing only view_file. LocalAgentConfig also takes ask_user policies and custom system_instructions.
How can I watch Google Antigravity SDK scripts and App conversations on a keypad or phone?
Orbtile shows local Antigravity desktop app conversations on a Logitech MX Creative Keypad, an iPhone or an Android phone. It also lets you answer up to four questions with two to four choices each. For your own Python scripts built with the Antigravity SDK, turn on the Adapter API in Orbtile under Settings and Agents, then report session states with the orbtile-adapter package.